From Bakewell to Billund (birthplace of Lego® in Denmark)

WEEK FIVE ALREADY! AND IT’S PASTRY WEEK
So, I have to be honest, this is my favourite week; pastry was one of the first things I really ‘cooked’, being a quiche Lorraine, which is still a firm family favourite, my Pops’ in particular. I do cheat sometimes with flakey pastry but I have never bought a single pack of shop made shortcrust pastry, even though I actually hate making it by hand (it’s something to do with the fatty flour under my finger nails, but more recently due to the arthritis in my thumb not helping with the rubbing in!) So,let us hope that I ‘bake well’ this week and that my Danish pastries ‘rise’ to the occasion.
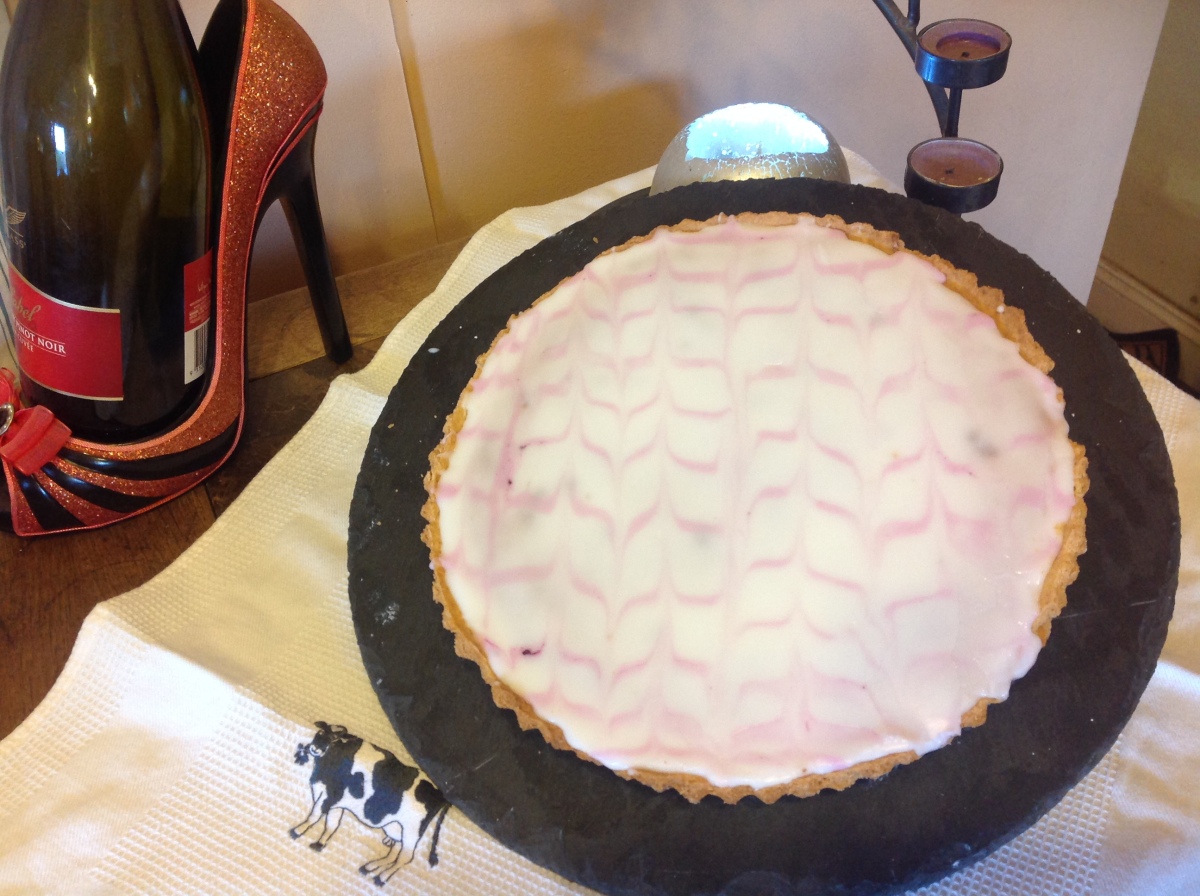
Bake number one of two – APPLE AND BLACKBERRY BAKEWELL TART
I could not resist doing the apple and blackberry jam as I have hundreds of apples growing outside and plenty of blackberries (I am sure the local bird population can spare a few) dotted all over our hedgerows on the farm.
 INGREDIENTS
8 oz plain flour
2 oz maize flour (also known as yellow cornmeal)
4 oz salted butter plus 1 oz lard (or 5 oz butter)
1 oz caster sugar
1 medium egg
splash of cold water
JAM: 2 medium sized baking apples
large handful of blackberries
sugar – ½ the weight of the fruit in sugar (mine weighed 300g so i used 150 g sugar)
FILLING: 4 0z butter
40z caster sugar
3 large eggs
4 oz ground almonds
DECORATION: 3 oz icing sugar with 2 tbspn liquid (e.g. water, lemon, fruit juice)
AND HERE’S WHAT YOU NEED TO DO
- Make pastry! Use fats direct from the fridge, cut into small cubes and rub it into the flour and maize until you have a mix that resembles breadcrumbs (or pop it in a food processor with a blade fitting and blitz for a few seconds!) Add the sugar and give it a good mix. Next add the egg and a couple of tablespoons of water and bring it all together to form a firm dough. Roll into a ball and leave this in the bowl, covered, and pop it into the fridge or pantry for an hour (made by hand) or 30 mins (machine made)
- Preheat the oven to 200°C. Roll out the pastry so that is large enough to line a 10″ loose bottom shallow tart tin or 8″ deep one if you prefer a ‘fatter’ tart. Line the tin; for a 10″ tin, you will need the pastry to be at least 12 inches across. Slide the bottom of the tin underneath it, folding the edges of the pastry up and over to exposed the edges of the base, pop this into the tart tin and then unfold the pastry up the sides! Simple! Leave a small excess of pastry round the edges to allow for shrinkage.


- Bake the pastry blind – cover with foil or baking parchment, slightly larger than the tart, then weigh down with baking beans – for approximately 20 minutes until it is just cooked and just changing colour. (leave the overhanging pastry on until the frangipane stage is done).
- Whilst the pastry is baking make the fruit compote/jam. Peel, core and chop the apples into small pieces, put in a pan with the blackberries and sugar and slow boil these, stirring occasionally, until the fruit has become mushy, take off the heat and allow to cool. (I never did look into how to make jam ‘properly’ but this method has always worked for me and you get it thick enough yet loose enough for spreading on the pastry case bottom; which is all you do with it once the case comes out of the oven (I like to let the pastry just sit for 5 minutes first). Alternatively use a shop bought jam!
- Turn the oven down to 180°C. Make the frangipane next. Gently melt the butter (either in a pan or microwave). Put the sugar and eggs in a bowl and give them a good whisk to make them light and fluffy. Whisk in the butter, then gently stir in the ground almonds. Pour this thick goo gently into the case (or use a spoon going from the outside, in) so as not to disturb the jam layer or it will ‘bleed’ into the almond mixture. Smooth the top over and place in the oven for approximately 35 minutes.
- Check the frangipane before removing from the oven. Touch the top gently, it should be firm but not solid to the touch, too much wobble and it will be underdone. (If it starts looking baked but still wobbly, simply turn the oven down 10 degrees and leave for another 10 minutes).
- Once it is out of the oven leave to cool completely in the tin. Now, either with a pair or scissors or sharp knife trim all around the edges (or gently roll over the top with a rolling pin) and brush away the excess pastry and crumbs with a pastry brush. Then remove the tart from the tin and place on serving plate.
- Mix the sieved icing sugar with a little liquid (I used apple juice for mine) until you have an icing that is thin enough to flow but firm enough not to be runny. Put a couple of tablespoons in a small dish and add a very small amount of colouring (I used a little blackberry juice) then put this into a small piping bag. Spoon the white icing over the tart and smooth it to the edges.
- Quickly snip the very bottom off the icing bag and pipe nice straight lines down the tart about 1″ apart. Turn the plate 180º and, using a thin skewer or cocktail stick, lightly drag down one line, then move over an inch and draw the line up, next line down and so on, to create a feathering effect. Leave this at least an hour or so to set off before enjoying with your favourite cuppa!


TIPS – Not too many for this bake as most have been included in the recipe, but one thing you must do is use a metal tart tin. Ceramic ones look nice, but they tend not to cook the bottom of the pastry very well and it’s the biggest no no of the Great British Bake Off is a soggy bottom! If you scrunch up your foil or parchment before butting into the pastry tin, it will be easier to shape to the tin.
You should have noticed from the recipe that I use maize aka yellow cornflour in my pastry, I think it makes the pastry lighter, shorter (crumblier) yet holds together better so you can get a much thinner layer that still holds its shape and form both raw and cooked; it also gives it a nice pale yellow hue too (but that could also be the corn fed hens eggs, I do like to look after my chucks.)
Bake 2 of 2 for pastry week – DANISH PASTRIES
As this is quite a long recipe (don’t be put off though, it is time consuming rather than difficult) I have split it into the basic dough first and then followed that with some filling/recipe ideas; however, you can let your imagination go wild with this bake, my main problem was deciding what you put in, and keep it down to just a couple of ideas, as new ones kept popping into my head. In the end I went with ingredients that i already had in! The dough is based on Paul Hollywoods’ own recipe, but it does seem to be a pretty standard recipe. Incidentally I think I much prefer the Danish word for, erm, Danish pastries, they call it wienerbr∅d, which basically mean bread from Vienna as the first accredited recipe was in the 1840’s from a Viennese chef.

THE STUFF YOU NEED TO MAKE IT:
- 500g strong bread flour
- 10g salt
- 80g sugar
- 10g instant yeast
- 2 medium eggs
- 100 ml cool water
- 100 ml tepid milk
- 250g unsalted butter (keep in fridge)
- food processor/mixer; medium sized bag; rolling pin; cling wrap or parchment paper
AND HOW YOU MAKE IT:
- Put the flour in the processor bowl, fitted with a dough hook, place the salt and sugar to one side and the yeast on the other. Make a well in the centre and add the eggs and the 2 liquids.
- Put the mixer on slow for about 1 minute to incorporate the ingredients. Then put it to a medium setting and leave it to run for around 5 minutes. Turn it off and check the dough, it should have gone elastic and have a mild sheen to it.

- Now the fun part! ‘Encourage’ the dough out of the bowl with a dough scraper onto a floured work surface and gently gather it up into a ball (you may want to oil or flour your hands too!) then pat it into a rough rectangle shape. Put a tiny amount of oil into your plastic bag, squish it together until the inside of the bag is well coated then simply put the dough inside, seal up and leave in the fridge for an hour.
- Take your butter. Spread a large piece of cling onto a hard surface, put the butter in the middle and cover with a 2nd sheet. Using your rolling pin, gently beat and roll the butter out to a neatish rectangle approx. 12 x 6½” (30 x 20cm). Place this into the fridge too.
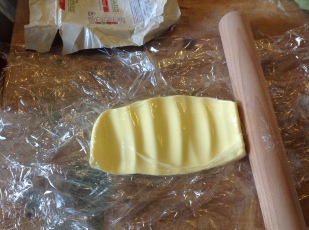
- Now roll out the dough to a rectangle roughly 18 x 7 inches. Have the shortest edge towards you. Place the butter at this end, so that it covers ⅔ the length of the dough.
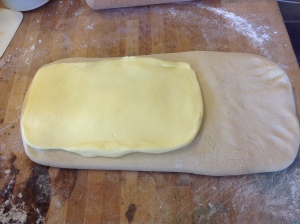 Fold the ‘uncovered’ ⅓ down over the butter and then fold the buttered end up and over this, keeping it as neat and rectangular as you can. This is a single fold and you should now have a layer of dough, then butter, then dough, then butter and finally dough. These stages are very important as they form the flaky layers in the finished pastry and will keep them light and buttery. Pinch together the ends, rebag and put back in the fridge for around another hour.
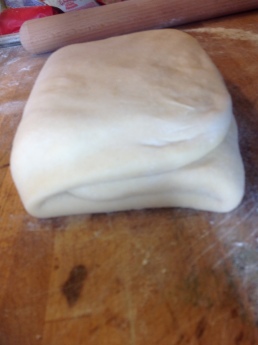
- With the narrow edge towards you, roll out again (18×7″) this time fold the furthest edge to the middle and then bottom edge to meet it in the middle and then fold this over again. This is known as a book fold. Yes, you guessed it, back in the fridge.


- Repeat the single fold twice more, each time returning the dough to the bag and fridge, then leave it (with plenty of room inside the bag to allow for rising) for a minimum of 6 hours or overnight to gently rise in the fridge. It is now ready to use with any filling you like, in any shape you fancy.
This dough is really funky, it is both pastry and a bread dough, it will be very spongy when rolling, and will require a tiny bit more effort when rolling as it will want to go into its own shape, especially when you are trying to form the individual pastries. I went with 2 (ish) basic flavours, home-made mincemeat & apple and pecan & banana; and tried 4 different shapes, rolls, pin windmills, kites and plaits.

So, it was a bit of a pastry fest the last 2 days at my house, as you can see from the picture above I just managed to get 24 medium sized Danish pastries from my dough. There are essentially 3 flavours, 2 proper one and one ‘cheat’ as i used a little of my left over apple and blackberry compote and some cream cheese in the last little bit of pastry for a yummy cheesecake flavour. I make my own mincemeat, and i will blog that recipe later on in the autumn, in time for christmas, as you need to make it whilst there’s a glut of apples.
MINCEMEAT & APPLE KITES and MINCEMEAT PIN-WINDMILLS
plus
BANANA PECAN PLAITS AND ROLLS
You require: (sorry going all Jamie Oliver stylee now with my measurements!)
- small jar of sweet mincemeat
- finely sliced eating apple
- big pinch of coconut sugar (any sugar will do really, this is just my ‘new’ find)
- a small egg (beaten)
- a good 2 handfuls of pecan nuts (roasted or toasted)
- roughly 6 untoasted pecans
- large tablespoon dollop of cream cheese
- 1 medium banana
- pinch of vanilla seeds or ½ tspn vanilla paste
- 500g Danish dough (as above)!
YOU NEED TO –
- Remove your dough from the fridge (where it should have been resting overnight).
- Prepare all of your fillings in readiness. Slice your apple and put in a small bowl with a little lemon juice water; beat your egg. In a small food processor, with a knife blade fitted, put in most of the toasted pecan nuts, keeping back about 6, blitz them for a few seconds. Add the cream cheese, banana and vanilla and blitz for a few seconds.
- You now have a pecan ‘butter’ paste.
- Divide your pastry in half and roll out the first ½, its not easy as this little monster is alive! It’s bubbly, elastic and set in its ways, wants to shrink back to its own shape, but just gently show it you’re the boss! You will need to cut this strip into squares approximately 4 inches across.
- Take half of the squares. Snip (I found it easier to use scissors for this one) diagonally from the corner towards the centre of the square, leaving about ½ inch clearance in the middle. Place a large dollop in the middle of each one then take the left hand corner of your 4 cuts, and fold this into the middle, using a little dab of water onto each one (I used the lemony water my apple was soaking in) just to hold them together. Place on a baking sheet and put inside a bag.

- With the other set of square, fold them in half on the diagonal (to form a triangle) then using a very sharp knife or scissors, cut up the sides (not the folded edge) from the fold to ½ inch from the outer edge. unfold them. Place a dollop of mincemeat in the centre of each take 2 slices of apple and place in the centre of the mincemeat, pull the left cut piece over to the right hand side and then gently pull the right hand cut over to the left hand side, again using a tiny spot of the water to hold them down.

- Again put these on a baking tray inside a plastic bag and set to one side.
- Roll out the remaining pastry dough and firstly cut 4 rectangles about 6×4 inches. place a heaped teaspoon of pecan paste down the length of the centre, not too wide, and crumble the 6 toasted pecans onto this paste. Using your scissors again, cut thin slots, diagonally, along each long edge, simply cross them over left, right, left right,
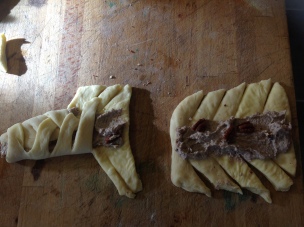 to the end, tucking your edges in neatly. You guessed it, put a dot of water onto the edges to keep them in place. Then it’s the baking tray and bag for them too.
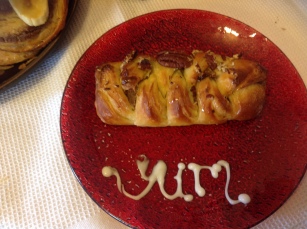
- Finally smooth the remaining pecan butter all over the remaining dough. Carefully and tightly roll up (the long edge) into a thick cigar shape. Cut, with a very sharp knife, into 1″ slices. Place on their side on a baking tray, give them a gentle press down and put in a plastic bag.

- Let the pastries prove for an hour, when they should plump up a little bit. Put the oven on at 200ºC, after about ½ hour so that it is ready when the first tray of pastries is ready to go in. Remove them from their bags and use the egg to glaze all exposed surfaces, avoiding the side edges, and sprinkle the mincemeat ones with a little pinch of sugar, and crumble up the untoasted pecans over the plaits, put them in the oven (if they don’t all fit leave covered in their bags until you have room so that they stay draught free).
- Bake for 20 minutes until golden and crispy. When you remove from the oven, gently lift to unsure that the bottoms are also golden and crispy. Place on a cooling rack to completely cool down.
Decorate with a little icing drizzle, or melted chocolate, or a drizzle of maple syrup goes well with the banana and pecan ones. And that’s breakfast, elevenses and supper sorted then! I know they sound a little complicated, but so worth it, taste is so much better than anything I personally have ever had from a shop!
TIPS – putting apples in lemon water will prevent them from going brown. Nuts are very easy to toast, simply put in the oven (I put mine in yesterday with the Bakewell tart) on a medium to high heat for 3-5 minutes, or onto a griddle or dry frying pan, for the same amount of time, but do keep your eye on them as they will go from toasted to burnt in seconds.

If you want to see more of the Bake Off inspired goodies that some of my fellow bloggers have done this week then take a peek at our host site run by Jenny Paulin. And if you do a foodie type blog too, it’s not too late to join in for this year; rules etc can be found at Mummy Mishaps.
And on a final note, it is with a heavy heart that we learned that Mary Berry will be leaving the GBBO when they transfer over to the new channel, I personally am glad that Paul Hollywood will stay with the show, which hopefully means that they will continue with a similar, if not the same, format. But do they keep it as a 1 hour programme (which would require a 1 hour 20 minute time slot) or do they ‘shave’ something off? Please don’t let it be the history section, I do rather enjoy that.
Now, this photo, I wonder if there’s a clue to the ‘new’ presenter over Mary’s shoulder!!??!!??!!??

Phew, that’s the lot then for this week, a long one this time I know, I really ought to cut down to one bake once in a while! Happy baking x

Those pastries look delicious, just wonderful combinations.
LikeLiked by 1 person
Wow so much baking and it all looks delicious!
LikeLiked by 1 person
All those pastries look great. I’ll have to get some maize flour and try it in, my next pastry in place of the usual.
LikeLiked by 1 person
Thanks Angela, maize is easy to get hold of these days, most Tescos sell it, in the world food section, Usually with the African or South American bit
LikeLike
wow Andrea look at all of those amazing danishes! No wonder it took you two days to enjoy your Danish pastry feast! i also love the sound of your fillings – i would have happily joined in your feast! interesting that you add maize flour to your shortcrust pastry – i always use my nanny’s recipe (apart from the Bakewell tart which was chocolate) so it has never occurred to me to look at other recipes. your pastries look delicious and thank you for linking up xx
LikeLike
Wow you ave been busy. It was all I could do to get my Danish done. But I shall make a bakewell tart at some point. though maybe not post. Yours does look pretty. as for the Danish yes please:)
LikeLike
My goodness, I take my hat off to you, you did an incredible bake this week. I can’t believe that you baked so much and so well! Congratulations on the star baker award – very well deserved!
LikeLike