WEEK 10 – THE FINAL BAKE

A picnic fit for a Queen

Minty lamb sausage rolls – quiche Lorraine – cheesy chorizo scones – white chocolate and raspberry tarts and the finale red velvet red velvet crown cake!
So, not being one to shy away from multiple bakes, I decided to to go for the final showstopper this week, a picnic fit for a Queen; which is rather apt as in just a few short weeks I will be playing a Queen in my local pantomime, Rapunzel. A lot of baking to do in one day, at least I did not have to do anything extra for dinner, it was quiche and sausage rolls with tart for pud! And I am very pleased to say that I made it in the time restraints, almost, all in all, I took 6½, it really was a case of one in, one out, of the oven. Simple recipes but a must for working out the chronology of things, what order to do steps in taking into account cooking times & temps and cooling periods etc.
I tried to stick to the brief in all the other aspects of the bake, the only little cheat I did was to do a family sized quiche rather than individual ones.
Just incase you wanted to know, it kinda went like this – flakey made, cakes made and in oven, pastry and sweet pastry made whilst they were baking (pop in freezer for 5 mins rest). Blind bake quiche case and tart cases, make scones whilst they are baking, then bake the scones. Make sausage filling, fill rolls and pop them in freezer for 5 minutes. Make coulis simultaneously fry onions and bacon and leave to cool. Cook sausage rolls in top of oven, fill quiche and bake. At this point I was glad of owning 3 cooking timers! Make butter cream. Fill and stack cakes, shape and cover in crumb coat of buttercream. Put in fridge for 30 minutes (time for a sit down and a cuppa). At the point (5 hours in) of everything being ‘cooked’ I decided that the final hour was for clearing and washing up and continued the following day. It took me around 1½ hours then to finish decorating the cake.
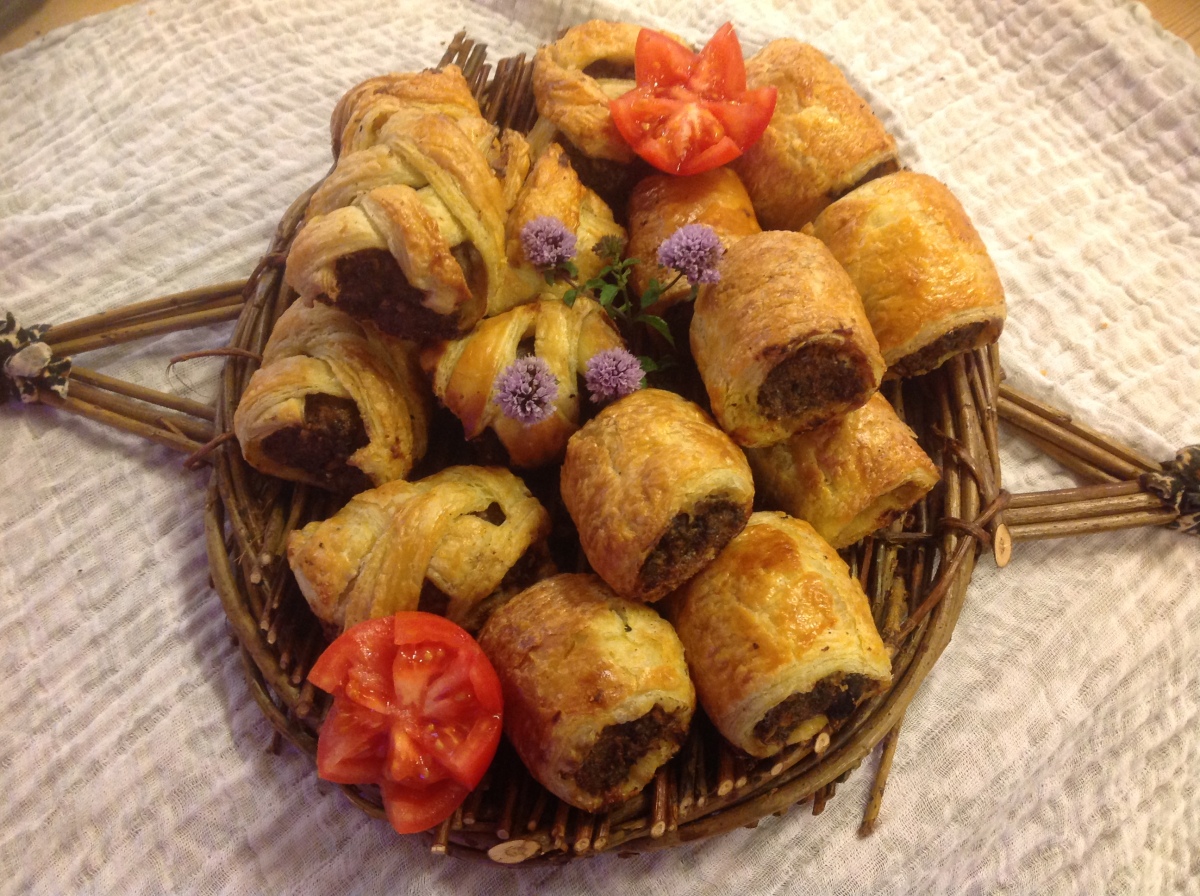
Minty Lamb Sausage Rolls
INGREDIENTS
FOR 500G FLAKY PASTRY
150g plain flour
150g strong white bread flour
2 large eggs
100ml cold water
250g butter (if unsalted add 1 teaspoon salt into flour)
FOR THE LAMB FILLING
500g lean lamb – finely minced
2.5cm black pudding – finely minced
1-2 tbs tomato purée
1 lamb stock cube
1 tbs dried or fresh mint
1 tbs garlic puree
good pinch pepper
1 medium sized onion
1 egg (for glazing)
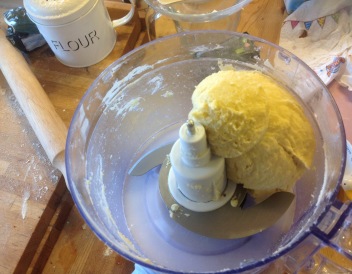
- Make your flaky pastry (as per instructions in week 9 of Great British Blog Off). Or alternatively you can buy a good quality butter one. Keep it in the fridge until meat ‘paste’ is ready. Preheat the oven to 190ºC/180 fan.
- Take a large bowl and put all the ingredients (except onion) in. Blitz the onion to a
 pulp, or, fine dice and sauté it for a few minutes until translucent, but leave to go cold. Add this to the bowl. Bring it all together so it is well
incorporated. You can use a utensil for this but I think you get a smoother consistency if you squidge it together but wash your hands well if you do! - Roll the pastry into a large rectangle the thickness of a £1 coin, cut in half lengthways (or into 3 strips if you want ‘cocktail’ rolls). Form the meat into sausage shapes and place the whole way along the pastry, covering the middle third. Lightly brush one edge with egg and roll it up from the opposite edge, using the eggy edge to seal it. Ensure that the ‘seam’ is on the bottom of the roll. Alternatively try a lattice roll by slicing 1cm slashes diagonally down the pastry, egg both edges and wrap alternate sides over tightly.


- Cut the roll into even pieces with a sharp knife (the length is up to you, whether you want a bite sized one for a buffet, a medium sized one for a picnic or a large one for dinner). Glaze with the beaten egg.
- Bake for 30 minutes until golden, risen and crispy. Leave to cool slightly before eating.
TIPS – You can ‘cheat’ with the filling and simply use your favourite sausages, just remove the meat from the casings. If you are making the lamb ones I recommend that you use a baking tray with a ‘lip’ and once you remove them from the oven you put them onto a wire cooling rack with the tray underneath as they will ooze a fair amount of fat. Plus, I would ask your butcher/meat provider for lean lamb mince. Final note, if, like me, you need to make flakey in a rush, then instead of an hour in fridge to harden butter up, then roughly 7 minutes in freezer will do (GBBO stylee haha).
Quiche Lorraine

FOR THE SHORTCRUST PASTRY: 250g/8oz plain flour
120g/4oz fat (I prefer ½ butter ½ lard)
approx 5 tbs water
FOR THE QUICHE: 6 rashers bacon
1 medium onion (small diced)
200g/7oz grated cheddar cheese
6 eggs
150ml full fat milk (or 100ml single cream)
pinch of pepper
sprinkle of oregano
RECIPE:
- Make the pastry either by hand or in food processor. Rub the fat into the flour until it resembles bread crumbs, add the water and bring together to form a dough. Tip onto a slightly floured surface and knead gently for a minute. Pop into a bag and leave in the fridge to rest, and the fats to refirm (10 minutes by machine, 30 minutes hand made). Preheat the oven to 200C
- Roll out the pastry to fit your quiche tin, carefully line the tin (without any holes or tears) with the pastry so you have a little overhang to allow for shrinkage. Line with baking parchment or foil, fill with baking beans and bake for approximately 15 minutes until the pastry is ‘just’ cooked. Remove and reduce oven temp to 170C.
- Meanwhile, cut the bacon into little pieces and fry until it is just cooked, remove from the pan, and gently fry the onions. Tip the bacon and onions into the pastry case along with the grated cheese (retain a couple of pinches of the cheese). Sprinkle the oregano on.

- In a jug, beat together the eggs, milk and pepper. Pour this carefully into the pastry case and place in the oven for 20 minutes. Pull the shelf out slightly and sprinkle the 2 pinches of cheese over and bake for a further 20 or so minutes.
- Once cooked the tart should feel firmish to the touch with just a gently wobble, if it is not quite set in the middle reduce the heat by 15º and cook for an extra 10-15 minutes. Remove and allow to cool, eat warm (not hot) or cold for a picnic.
TIPS: If you have more than one pastry in the fridge it’s a good idea to mark them so that you know which is which – for example my flakey was oblong, but my quiche pastry and sweet pastry looked the same so I marked a P in the plain one! Pastry that is sealed in a bag will be ok in a fridge for 2-3 days and also freezes well too. I like to keep a small ball of pastry over for 2 reasons, you can use it to push the pastry neatly into the flutes of the tin and if you get any cracks in the baked case then you can use tiny pieces to plug the gaps. When you make a quiche or tart, it is always a good idea to leave an ‘overhang’ on the pastry just incase it shrinks when it is in the oven. To get a good finish on the edge after it’s cooked, roll over it lightly with a rolling pin and brush excess off with a pastry brush. Don’t add salt to a quiche as you will have plenty in the cheese and bacon and, salt will rapidly degrade eggs, causing them to go ‘liquid’. If you do not have any ceramic baking beans, used dry pulses like chickpeas, you will need a lot and won’t be able to use them to eat afterward, or, use teaspoons and/or forks to weight down the pastry so that the base does not lift up.


Cheesey Chorizo Scones

What you will need –
225g strong bread flour
1 tbsp baking powder
50g butter (melted and cooled slightly)
1 egg (beaten)
125ml finger warm milk
175g grated strong mature cheese (this recipe used cage aged goats cheese)
100g cooked chorizo (very small dice)
What you will need to do –
- Preheat the oven to 200C/gas 6
- Place the flour and baking powder in a large bowl. Add the butter, egg (leave a tiny amount of egg behind for glazing) and milk and mix well with your hand to combine. Add the cheese (retaining a couple of pinches) and chorizo and bring it all together to a slightly sticky ball of dough.
- Tip this onto a well floured board and knead for a couple of minutes. Now, work the dough a little, to encourage air into it. gently spread the dough out, fold in half and draw it into a ball form. the scootch it under with flat palms whilst turning at the same time.


- Roll out to around 2.5 cm depth and cut out with a medium sized circular cutter (you will get between 9 and 13 depending on how deep they are and the size of your cutter). Use a pastry brush to brush the retained eggs over the tops of the sconces.
- Place in the oven and cook for 12 minutes. remove and sprinkle the cheese evenly over the tops. Place back in the oven and cook for a further 12 minutes until golden and the cheese has melted.
- Split and enjoy with best butter.
TIP – When making doughs it’s a good idea to bring it together using just one hand to begin with and that way you have a clean hand for adding in extra ingredients and incase you need to reflour your work surface. When glazing scones only do the top as, if egg goes over the sides it will impede the rise.
I was so disappointed with myself as when I took my tray of scones out of the oven to put the cheese on, I dropped it (and it landed upside down) onto the oven door and most of them were squashed down a bit so they don’t look the best in the photos, and until then they were spot on! At least they did not land on the floor and they did taste good anyway.

White Chocolate Tart with Raspberry and Basil Coulis

For the sweet shortcrust pastry:
250g/8oz plain flour
120g/4oz butter
30g/1oz caster sugar
1 small egg
2 tbs water
For the filling:
100g raspberries
50g sieved icing sugar
few drops of basil essence (or 1tsp fresh basil)
200ml double cream
275g/9oz white chocolate
25g good quality unsalted butter
½ pod vanilla seeds
For the recipe:
- Make the pastry, either by hand or food processor. Rub the fat into the flour, mix in the sugar, add the egg and the water and bring together into a dough. Put into a bag and leave in a cold place to rest (10 minutes machine/30 mins by hand).
- Preheat the oven to 200C.
- Roll out your pastry to the thickness of a £1 (or slightly thinner if you dare, as the thinner it is the crispier it will be!) and cut in circles (using a cutter) to fit into your tart tins. Gently press into your tins.
- Line with baking parchment or foil (scrunch up then smooth out first so it fits better into the small tins) then fill with baking beans. Bake blind for approx 15 mins.
- Make the coulis. Pass the raspberries through a sieve, into a saucepan, to remove the seeds (takes a few minutes this). Beat in the sugar and basil, gently heat to a simmer for approx 5 minutes, the pulp will thicken slightly. Leave to cool.
- Remove pastry shells from oven, take out the beans, put back in the oven for another 5 minutes until the pastry is golden and crispy. Remove from oven and fully cool on a wire rack.
- Warm the cream and vanilla in a saucepan, remove from heat at first sign of steam/heat ripples. Break up the chocolate into small pieces, add the butter to the cream and beat well then add in the chocolate and beat in well. It will take a couple of minutes and look gross before suddenly going glossy and smooth.

- Pour the chocolate ganache into the pastry shells. Take a teaspoon of the coulis and ‘cut’ into the chocolate so that the raspberry goes underneath. Depending on the size of your tarts (I made 6 large, shallow ones and 6 small, deep ones) do this 1 – 3 times. Then take a skewer and drag through the coulis to create a ‘swirl’ through the chocolate. Leave the completed tarts in a cold place to fully set.
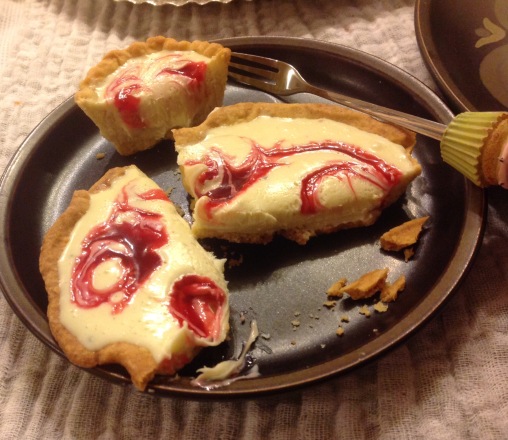
TIPS – you can use any raspberries you like for making the coulis, fresh, frozen or tinned (preferably in natural juice); but if using tinned or frozen discard almost all the juice or your coulis will be more of a pouring sauce.
Okay, if I do say so myself these tarts were amazing. Mr Timothy gave me a ‘double clasp handshake’ for them (he just had one for breakfast!); they are just set, but still gooey and the sharpness of the fruit really offsets the sweetness of the chocolate. The basil goes so well with raspberries (it’s up there with black pepper with strawberries and chilli & watermelon) it gives them a subtle aniseed like flavour.
Chocolate Cake – fit for a Queen

Red Velvet, Red Velvet Crown Cake
CAKE 7 eggs (crack into a jug and weigh)
same amount (in weight) as the eggs of
baking butter
caster sugar
self raising flour
75g cocoa powder
2tsp baking powder
75g ground almonds
3 tbsp natural beetroot powder (or 1tbsp red food colour)
CREAM CHEESE ICING 200g pale soft butter
700g sieved icing sugar
200g ricotta cheese
2 tbsp chocolate vermicelli
DECORATION 700g red fondant icing paste
small pack white or pale yellow fondant
gold food colour
gold glitter
edible glue
large pack of jelly sweets
pearl dragees
non edible diamanté string
RECIPE
- Preheat the oven 175C. Make the cake either by creaming method or all in one method. But it’s better to make in a free standing mixer as it is a lot of batter. If using all in method add the ground almonds on their own at the end.
- Split the cake mix evenly between 3 baking tins – 2 x (ensure that the smaller cake will be the same height as the other 2) bake for 25-35 minutes until cooked through. Insert a skewer into the middle and it should come out clean. If not, turn oven down 20º and leave cake in for a further 15 minutes.
- Leave the cakes to cool in tins for 10 minutes, and they will begin to come away from the tin. Go around the tin with a thin palette knife to ensure it is fully clear before removing. Leave to go fully cold on cooling racks.
- Make the buttercream. Put the butter in a free standing mixer, and soften it up. Add ⅓ of the icing sugar, stir it in, repeat with the next 3rd then with the remainder. Give it a good mix with the mixer. Add the cream cheese and give it a good mix. The more you can whip it, the whiter and lighter it will become. Cover and leave somewhere cool.
- Make sure the cakes are level/flat tops. Sandwich together the cakes with plenty of the buttercream cheese then sandwich the little one in the middle of the other 2 with plenty of the cream cheese. Use 3 straws, dowels or stales to hold the cake together. Then with a sharp serrated knife round off the edges of the top cake to from the rounded top of the crown. And cut a small indent into the centre of the cake (for the ball to sit in).
- Completely cover the cake with a thin coat of the butter cream taking care to make
 sure it is smooth all over. This is known as the crumb coat and ensures an even finish on the completed crown. Make sure that you leave enough buttercream for the ‘ermine’ collar, and for this you simply add chocolate vermicelli to the cream cheese, cover and put in the fridge
 - Put the cake in the fridge for 20-30 minutes (or freezer for 10) to firm up the buttercream layer. Squeeze the red fondant to soften it then roll it out to the required size for your cake (mine was 34cm from bottom layer up and over – I forgot to take photos as I was rushing a little to get it done in an hour so here’s one I drew later haha). If your dowel rods are too long cut them down before covering with the fondant.
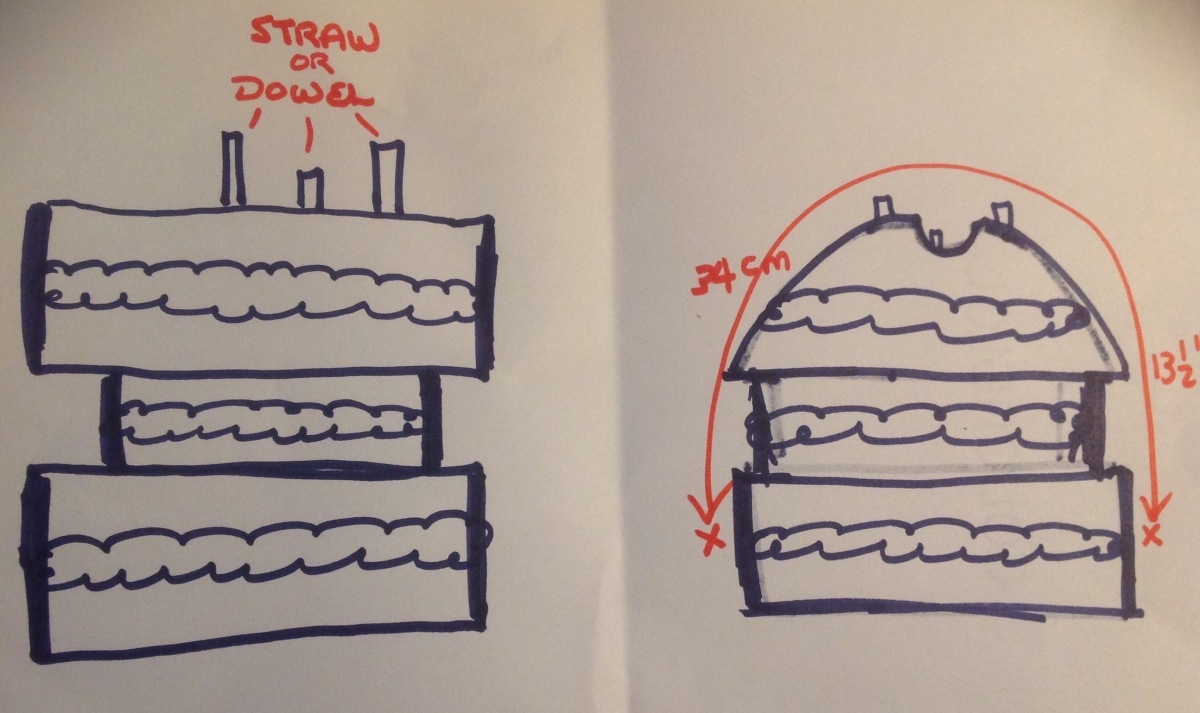
- Place the fondant over a rolling pin and place over the cake so that it just comes down over the butter cream on the bottom cake layer (where the x‘s are). Iron out the cake using a cake smoother. Trim off any excess.
- Roll out the yellow fondant (or white coloured with gold). Cut into 2cm wide strips and using edible glue stick them from the lip of the indent to the bottom of the red paste. Then put a strip all the way around the bottom cake (about where the buttercream is). Lightly cover the gold strips with edible glue and very carefully paint edible gold glitter all over it. Glue on your jelly sweets to resemble jewels. Roll up a ball of the yellow fondant and cover in the gold glitter and pop this into the indent on the top. Make the ‘square’ embellishment for the top (I used gold tape as the fondant would have been too soft to stand up on its own).
- The final finishes I did were white pearl dragees up 2 of the strips and some diamanté strips up the other 2 again using the edible glue. Ensure if you are using non-edible embellishments on your cake that the recipients are aware of this.
- And lastly take the vermicelli buttercream, in a piping bag, cut of the end fairly wide, and simply pipe all the way around the bottom to represent the ermine (you don’t even have to be neat is it’s a representation of fur). Then just to add a teeny bit of extra detail I took the end of my paint brush and did a few ‘natural’ creases into the red velvet and just dusted into them with petal dust to give it a more velvety effect.


TIPS – when working with fondant I recommend dusting with a 50:50 mix of cornflour and icing sugar your work surface for large sheets and a tiny spray of vegetable oil for smaller pieces to prevent sticking. Use acrylic rolling pins and cutters too (a pizza cutter will also give you a good sharp edge on the fondant).
Not really got many tips to add to the bottom of this, as I have mainly incorporated these throughout the recipe. I hope it gives you enough detail, without teaching any of you more experienced bakers to ‘suck eggs’. I would like to mention that I saw a picture of a similar cake by Fiona Cairns, which gave me the basis for this one. I was really chuffed that I managed to get all that decorating done in 1½ hours, even with the horrible damp British weather against me (hence the lovely sheen on the red velvet. When I told Mr Timothy he had a big cake to eat, he nearly cried, he has been forced to eat so much cake this last 10 weeks that I have had to promise no more for a few weeks! Handily my drama chums were really pleased when I turned up at set painting with a massive cake, especially so as it came from “Queenie” – I will be playing the Queen in this years’ panto Rapunzel.
So there you have it the end of Great Bloggers Bake Off for 2016, and ‘sob‘ the end of the Great British Bake Off as we know it from the BBC and with the Queen of baking herself, Mary Berry. I have heard a horrible rumour that there will be no show at all next year so it is going to be 2018 before we have another official one – lets hope that it all goes to plan then! Thank you so much for following us (if you did!) and if you would like to see the other ladies’ cakes and bakes then click on this link which will take you to our host Jenny Paulins’ site Mummy Mishaps .

I would like to express my thanks to Jenny Paulin for all her work organising us all, putting up with all our mithering and questions and for working with Tesco to get us some great prizes and vouchers for our ingredients for the blogs (and of course a big whoop for Tesco!). And finally thank you to all the other peeps that have joined in with the Great Bloggers Bake Off over the 10 weeks, I will miss you xx


Amazing work! It makes me exhausted just reading all that!
LikeLiked by 1 person
Thank you Helen, it was the clearing up that was a pain!
LikeLike
What a fabulous spread, congratulations on a lovely bake x
LikeLike
Thank you Cathy x
LikeLike
Well done on making the whole royal picnic!
LikeLiked by 1 person
Thank you Lucy x
LikeLike
Blimey Andrea I cannot believe you went to so much trouble for the bake along and you got it done in time too. I do not envy you all that cleaning and tidying after – that is the worse part about any kind of baking or cooking session (especially in my case as I am VERY messy!). It all looks and sounds so delicious and just looks so homemade and tasty too. My fav is that case though – it looks amazing and just like a crown!
Thank YOU for baking each week and joining in – its been such fun 🙂 Good luck for the final judging x
LikeLike
Haha, thanks Jenny, I too was stunned that I got it done in the time too, 2 full dish washer loads and a mountain of baking tins, trays and cooling trays later, I’m having this’s week off. No, hold on Christmas cake, pudding mincemeat ……..
LikeLike
A lovely spread you must be exhausted. I do love your crown cake very creative and looks fabulous. Ive just finished my bake and still have to blog. Oh boy the washing up is no fun either. How can you be thinking of Christmas bakes this week after that baking marathon.
LikeLiked by 1 person
Thank you Jackie. Unfortunately I am having surgery December so have to get all my Christmas stuff done ready, plus my panto, plus I have a harp exam, I will truly be looking forward to my op, November will be soooo busy, so I can put my feet up mid December till January hehe
LikeLike
Oh my word what a spread!! That crown red velvet! WOW! Well done you xxx
LikeLike
Aww thank you Hazel
LikeLike
Your cake looks stunning. I saw it on Facebook before reading your post and I was so impressed with it. x
LikeLike
Thank you Anca 😳
LikeLike